
All About GitHub Copilot Custom Instructions
- Nathan

- Nov 22, 2025
- 5 min read
Updated: Jan 11
GitHub Copilot can be used in many different ways (copilot chat, copilot coding agent, copilot code review, etc.). It can also be used in many different applications (GitHub.com, VS Code, Visual Studio, etc.). Finally, there are many ways to customize how Copilot works (repository instructions, path instructions, custom agents, etc.).
The goal of this post will be to break down the various different methods of customizing Copilot's behavior and explaining when and where each method works.
Before we go any further, I do want to provide a warning directly from the GitHub docs: "Due to the non-deterministic nature of AI, Copilot may not always follow your custom instructions in exactly the same way every time they are used."
First, let me show you a couple of graphics I created which try to organize things as best as I could. These options will be explained in further detail below.
Application support for each type of customization:

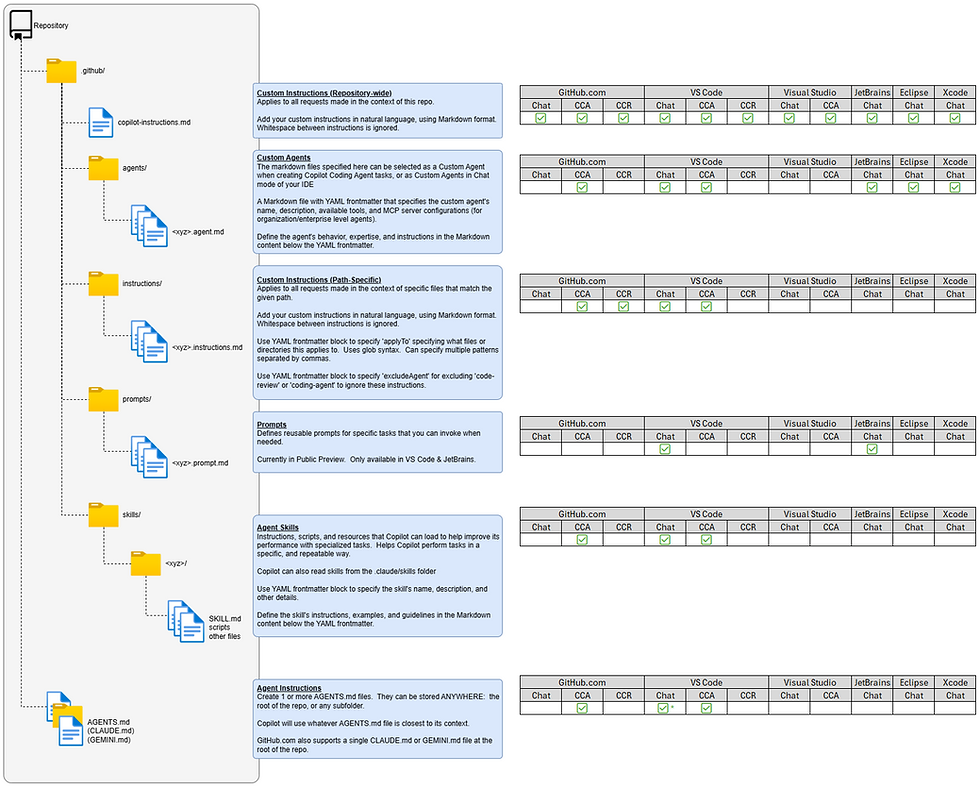
And here is a view of where these customization files live within your GitHub repository. Also, included is a short description for each one. Please click on the image to expand it to the full size.
Precedence and Order of Operations
Multiple different types of custom instructions can apply to a single request sent to Copilot.
Personal instructions take the highest priority, followed by repository instructions, with organization instructions prioritized last.
However, ALL sets of relevant instructions are still combined and provided to Copilot.
Whenever possible, you should avoid providing conflicting sets of instructions.
Repository-wide Custom Instructions
Support: This has the widest support between the Copilot modes and applications.
Usage: Repository-wide Custom Instructions apply to all Copilot requests that are made in the context of a repository.
How to create: In the .github folder (notice the leading period) create a file named copilot-instructions.md
Links:
Path-specific Custom Instructions
Support: Path-specific Custom Instructions only apply to Copilot Coding Agent (CCA) and Copilot Code Review (CCR). Also, they only apply to GitHub.com and VS Code.
Usage: Path-specific Custom Instructions apply to Copilot requests that are made in the context of files that match a given pattern. You can specify multiple patterns in a single instructions file.
How to create: In the .github/instructions folder (notice the leading period) create one or more files named xyz.instructions.md (replacing xyz with your own name)
Use YAML frontmatter in your md files:
The applyTo keyword specifies the file pattern(s) that this will apply to. The patterns use glob syntax. Multiple patterns can be provide by separating them with commas.
Optionally, if desired, the excludeAgent keyword can be used to exclude either "code-review" (CCR) or "code-agent" (CCA)
Links:
Custom Agents
Support: Custom Agents apply to Copilot Coding Agent (CCA) in GitHub.com and VS Code. They also apply to Copilot Chat in VS Code, JetBrains, Eclipse and Xcode. However, those last 3 IDEs are in public preview, currently.
Usage:
When you are using Copilot Coding Agent (CCA), you can assign a Custom Agent to your new task
When you are using Copilot Chat in your IDE, then you can pick your Custom Agent to chat with
How to create: In the .github/agents folder (notice the leading period) create one or more files named xyz.agent.md (replacing xyz with your own name)
Use YAML frontmatter in your md files to define various keywords for your agent like name, description, tools, mcp-servers, and more. For a full list of frontmatter keywords, see the docs.
Add things like the agent's behavior, expertise, and natural language instructions, in Markdown format
Links:
Prompts
Support: Prompts only apply to Copilot Chat in VS Code and JetBrains. Currently, they are in public preview.
Usage: These are standalone prompts that you call directly from Copilot Chat.
How to create: In the .github/prompts folder (notice the leading period) create one or more files named xyz.prompt.md (replacing xyz with your own name)
Use YAML frontmatter in your md files to define various keywords for your prompt like name, description, tools, agent, and more. For a full list of frontmatter keywords, see the docs.
The prompt file body contains the prompt text that is sent to the LLM when running the prompt in chat. Provide specific instructions, guidelines, or any other relevant information that you want the AI to follow.
Links:
Agent Skills
Support: Agent skills can be used in Copilot Coding Agent (CCA) as well as Agent Mode in VS Code. This is an open format, originally created by Anthropic.
Usage: Skills help Copilot perform tasks in a specific, repeatable way. Skills include any necessary instructions, scripts, and resources that may be required by your particular task.
How to create: In the .github/skills folder (notice the leading period) create a subfolder per skill named xyz (replacing xyz with your own name)
Inside your new folder, create a SKILL.md file. This file should have some YAML frontmatter with certain keywords like name, description, and others. Below the YAML frontmatter, include Markdown content that defines the skill's instructions, examples, and guidelines for Copilot to follow
Note: Copilot will also support Agents Skills under the .claude/skills folder (notice the leading period)
Links:
Agent Instructions
Support: Agent Instructions are only supported by Copilot Chat in VS Code, and Copilot Coding Agent (CCA) in GitHub.com and VS Code. This is an open format, originally created by OpenAI.
Usage: With regards to Copilot, these are very similar to repository-wide Custom Instructions.
How to create:
In the root of your repository, create a file named AGENTS.md
You can also create other AGENTS.md files in any subfolders
Support for subfolders in VS Code is currently experimental and is turned off by default. See the docs for more info.
Alternatively, for GitHub.com only, you can create a single CLAUDE.md or GEMINI.md file stored in the root of your repository.
As stated above, you can create multiple AGENTS.md files in multiple subfolders as well as in the root of your repo. When Copilot is working, the nearest AGENTS.md file in the directory tree will take precedence.
Links:
Personal Instructions
You can add personal custom instructions in order to receive chat responses that are customized to your personal preferences. This only applies to Copilot Chat on GitHub.com and nowhere else.
How to create: Open Copilot Chat on GitHub.com. In the bottom-left corner click on your profile photo and then click "Personal Instructions." Add natural language instructions and when you are done click "Save."
Comments